
Looking to get serious about Alignments for your Track or Race car but don’t have the budget for frequent shop alignments OR expensive equipment? Good News: Accurate track alignments are doable just by hobbling together some scrap metal and string, read on for more info!
There are plenty of decent guides around the internet on aligning your car with a string setup, but I was intimidated by the equipment needed. After a friend showed me his rig, I realized there isn’t any special magic involved. With this post I’ll show you how I made my setup and how you can do it too, all while spending less than a what you’ll pay for an average performance alignment.

Do you want to go as fast as your car can possibly go? These are the 4 factors towards that goal.
- Driver Skill: Know how to drive that car
- Grip: Have good, grippy tires on it
- Alignment: Have the Wheels pointed in the right direction!
- Everything else
Note #3 above. Alignment is the “unsung” hero when tracking a car. Sure, most diehard track people understand alignments and their importance, but I’d say they’re still undervalued by most. Raise your hand if you did years of HPDE on an initial alignment. My hand is up. Alignments stand out even more in Spec Racing, with a tight field of similarly prepped cars. Not only can a bad alignment prevent you from going fast (4 tires pointed in different directions) it can GREATLY affect how your car handles under braking, into a corner, in the the corner, and exiting the corner… everywhere.

I am not a lifetime alignment expert. I know just enough to be dangerous… Say I’m still on the fun part of the Dunning-Kruger curve. I had been doing a mix of shop alignments and home tweaks over the past few years. The last two seasons I’ve been running just with my own garage alignments (While taking lots of advice from people smarter and more experienced than me).
Onto the No-Money-Motorsports portion: A true precision alignment takes a LOT of time, and either a LOT of skill, or a Lot of patience (ideally, both). Time+skill+patience+tools=$$. If you’re looking to put on a consistent race effort via a well-aligned car… and you don’t have a buddy around the corner who is happy to do precise alignments for beer… it’s time to learn to do it yourself, or be prepared to pay a professional at a race shop well (Because it takes a good deal of their time).
Professional tire and alignment shops drop tens of thousands of dollars on the latest and greatest digital laser alignment machines, with all sorts of fancy equipment… all so they can check toe on all 35 Camrys, CRV’s, and Rogues that came in for tires that day. Those systems make the job quick and easy, but don’t let the equipment scare you away from doing your own alignment; In your garage; With a few bucks in tools and equipment from Home Depot Motorsports.
Mass produced alignment machines are designed to work well for that 99.9% of their intended workload = Quickly getting streetcars back within giant OEM specified acceptable alignment parameters. Ask a racer who brought their own alignment specs to a general garage, the vast majority of them will have some sort of horror story. I have a few experiences myself. I learned that just because a garage has pictures on the walls of racecars from the local oval track, doesn’t mean your $150 alignment will get you a tech who has any idea of how (or intention) to give a track alignment. After 3 junky alignments over a couple years, I finally went to a real race prep shop. I was initially very concerned about the lack of machine as AJ Hartman pulled out stands, strings, and other manual alignment gear. It turns out, professional race shops often have some mix of analog (String) gear and digital readers. Not only can these archaic methods get the job done, they can often get it done better… but at the expense of time. After years of fighting bad alignments and arguing with alignment techs who say “it’s just gonna pull now”… My car left AJ’s shop feeling worlds better than it EVER had.
Over the last ~10 years since that trip, I’ve picked up a bunch of tricks from other race shops (Dave at T&Z Auto Services being another huge help) and my own trial and error.
So – Here is my guide for building your own alignment rig and doing garage alignments yourself… for less than the cost of a single performance shop alignment: You can do an alignment with VERY Basic tools, there are countless alignment tools and systems for sale, some help the job go quicker, some make it easier… but they aren’t doing it more accurately.
Let’s get into the 11 essential parts of doing a Race Alignment in your own garage:
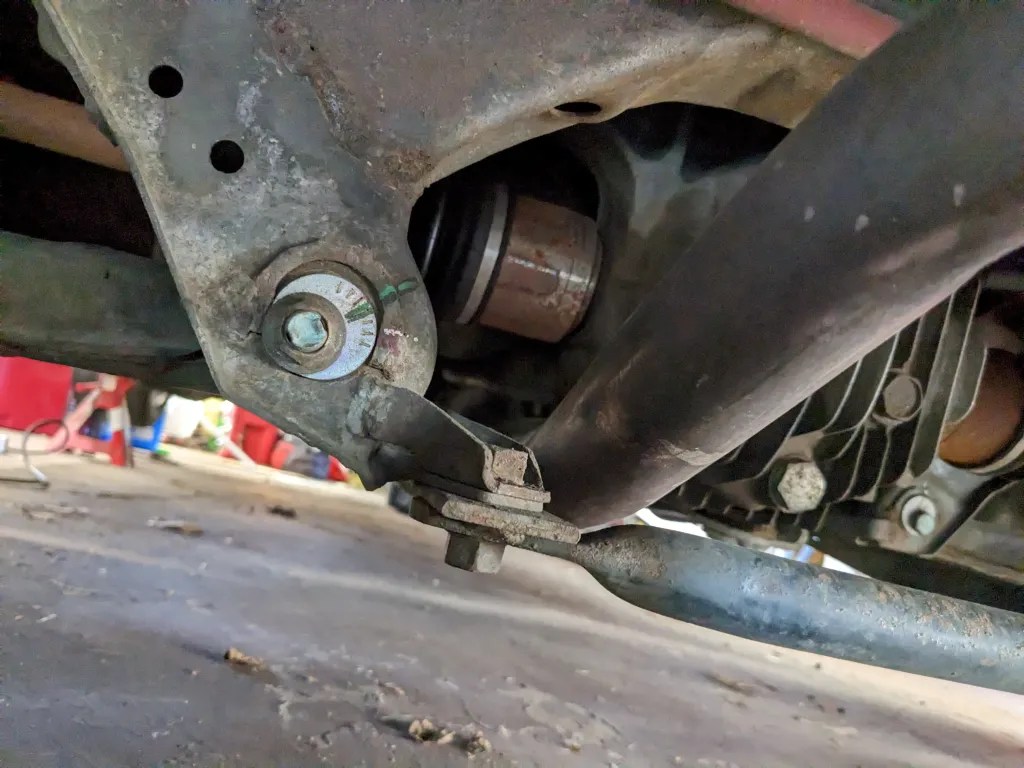
1) BEFORE you start – BE PREPARED – Chances are, your track car isn’t some 3 year old model, still carrying a hint of that delightful new car smell. It’s worn, older, probably rusted, and has likely seen its fair share of potholes and curbs. Those Alignment bolts are probably old enough to drink by now. Before tackling an alignment make sure your aligning methods are free to move, nothing is obnoxiously bent, and nothing (like balljoints) are on the edge of failure.
For Miatas, this means buying a set of alignment bolts for the entire car. These bolts (8 in total) add up to be a hair on the “annoyingly expensive” side, but they are a regularly replaced item for a serious racer. For a Miata that hasn’t seen an alignment in 10 years? You’re almost certain to have issues with at least a couple between freezing or worn/stripped washer cams.

2) Stands & Stance: The first thing to have when getting started is having ROOM to move under the car while keeping the suspension totally loaded. If a car is on a jack or sitting in any way other than how it would roll onto the track: Your alignment numbers won’t even be close to what you’ll have on track. This is why professional alignment machines are usually drive-up racks, so the car stays flat but you can also reach the adjustable surfaces.
Alternatively, If you need to jack the car up to reach and adjust bolts, drop, roll for every adjustment, doing an alignment will take forever. To make my life easier I built these blocks out of some scrap wood I had lying around. They began as 2×8 boards. 24” long, 7 ½” wide. The 2×8 base boards aren’t quite wide enough to comfortably (easily) place an entire tire on, and they’re definitely not wide enough to place toe plates on, so in my latest version I added 2×12’s to the top. Sure, adding another ~4” of unsupported overhanging wood doesn’t seem like a great idea both for strength and tipping potential of the stands… but I put 1” inside to catch any extra tire without having much unsupported overhang, and leave the other 3” on the outside with the primary purpose of being a toe-plate platform. I’m still trying to have the tire 100% supported with the underlying structure of the stands… but now if they’re a tiny bit off, the tire still remains supported. If I was starting fresh, I’d build the entire stands with 2×10’s, or better yet: 2×12’s.

Once you have a good working platform, many strive to ensure that platform is also level, to get the absolute truest numbers. I had intended on designing a leveling apparatus and shimming the individual platforms to achieve a perfectly level surface: However, my garage is close enough to level to make me happy so I haven’t bothered, yet. [I’ll update when I do level the floor, but I intend to use a 10’ piece of metal bar as a stand for my level and then use ¼” shims under the lift blocks to get them level with eachother]

After the car is set to your liking, you need to ensure it is weighted AS you intend to drive it. The largest concern: Driver weight. If you have a similarly weighted friend who doesn’t mind sitting in the seat all day, great! For the rest of us, you need to find some way to add your weight to the driver seat. At less than $5, one of the cheapest methods is 50lb bags of all purpose sand from your local hardware store (just put them in garbage bags also because I’ve never met a bag of sand that doesn’t leak). Ideally, your fuel load will also be similar to race condition… Just filled up? Oops, It’s probably a good idea to run some of that gas down or pump it out if you can…but I usually don’t worry about it.
3) Slip Plates: So you’ve got your car up on blocks with the suspension loaded and you’re ready to adjust. One more thing you need: Some Slip. As you move the alignment bolt on the car, you want the tire to move accordingly, but with the weight of the car on that wheel it will naturally resist sliding. This is where Slip Plates come in – A way or the wheels to be sitting on a slightly movable surface, so as you adjust the control arm out… the wheel can move out, and your adjustment moves properly instead of binding up the suspension.
Of course there are fancy metal plates designed for this exact purpose, but it’s another item that ranges from a couple hundred dollars to “Wait, seriously, how much does it cost”. A few favorite “low budget” slip plates include linoleum floor tiles, face to face, with a shot of lube between them. The method that has seemed to work fine for me is simply taking heavy duty garbage bags (the black construction site ones), folding them over a few times, and using them as my slippery surface. I bought $2 2’x1′ linoleum floor tiles to make the surface a bit more slippery for the bags, it seems to help as well.

*A Note. Now that the car can slip, remember to be extra cautious that you don’t slip the car right off the side of the alignment blocks. Especially as you pull yourself out from under the car. I’ve had a few people suggest I add small stops on the ends of the blocks so the car doesn’t fall off. While I haven’t had issues with the car falling, this is certainly a good idea and I’ll probably add it in my next version.
4) Toe Plates: Toe is the #1 most important part of alignment, it will play the largest role in the way the car handles and wears tires. Thankfully, toe is also simple to measure. Later, we will discuss strings to set up an alignment “Box” around the car to get individual wheel toe, but toe-plates serve as an extremely important, simple “test” of our box measurements by getting overall toe numbers for front and rear. Toe plates are also an essential tool to bring to the track for quick checks/adjustments if you make contact or the car just feels “off”. Even if I go through a race weekend uneventfully, I’ll spend the 3 minutes to check toe between events.
Initially, I began measuring toe with home made wooden to plates (out of 1×10 or cut plywood with slots cut for tape)… but the wood warped pretty quickly, so I moved on to a real metal set. With the generally low cost of toe plates, they are worth buying vs building your own.

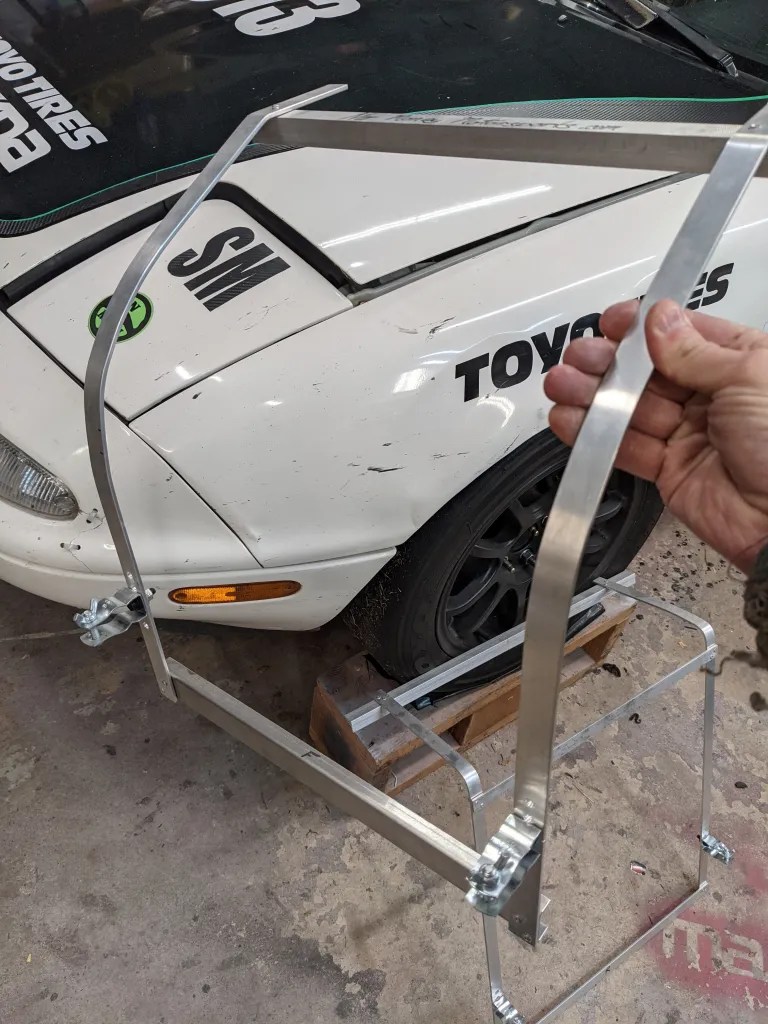
5) The Box: Here we are – The complicated part of this build: Building a proper, square string “box” around the car is the most essential step for measuring individual wheel toe. There are multiple ways to do this, I choose to hang brackets off the car, which then hold up horizontal bars. These bars hold up my string “box” down the side of the cars. A more simple (Though, in my opinion not as effective) box is to place jack stands on the floor, out from each corner, and hanging strings on them to “Square” the car… however if your box is attached to the car, you are able to adjust and move the car without disturbing “the box”.
While string alignment kits for this purpose can possibly be found in the $250-$500 range, building your own can be quite simple. I built mine with some aluminum bar, EMT conduit, a rivet gun, and a couple pieces of pipe hangers.
First: I built mine of thin aluminum bar to hook on the inner lip of my bumpers and hang over my bumpers. This gives a steady, repeatable place to hang the ultra-important parallel bars. You can build/cut/bend these yourself in any design you like so long as they are secure and stable platforms for the horizontal bars.


The Hanging Rigs exist as a method to hold the parallel bars, which serve as the guide for the string that runs down the sides of the car, creating our “box”. It’s important that these bars are parallel, centered, even, and about the height of the center of your hubs. For these tubes, I used EMT conduit from the hardware store. Home Depot had some on the shelf with a healthy wave (bend), but finding two straight tubes was no problem. A quick check for if/how bent a bar is, is to roll the bar on the ground of the store.
Once I had the pipes, I cut them down to length (A few inches wider than the overall outer wheel width) and used the tubing cutter to notch the pipes in a few spots as measuring/setup marks. I then made another “wire notch” to hold the strings in place, I made my wire notches about 4″ wider apart than my hubs so the wire will sit reasonably close, without being on top of the hubs. Attaching the bars to the car brackets was easy with “conduit hangers”. I measured the height from the floor to the center of my hubs and used that height as my desired horizontal bar height for when I drilled holes to install the hangers. I drilled extra holes at a few different spots up and down the hanging rigs so I could adjust the bars up and down later if needed. I also replaced the hanger nuts with wingnuts to make adjusting a quicker no-tool job.


Next up is string. Since your measurements are going to be accurate you need something thin that can be pulled tight and won’t sag. Fishing line was a pretty easy choice. However, standard fishing line was pretty tough to see, especially when you add the fatigue of working in a garage after an already long day at work. A colored Fishing Line (I chose red, 12lb) is so much easier to use. Simple $1 spring clamps hold the string in place with enough weight to also keep the string tight.

Once you have all this set, you need to adjust the horizontal bars side-to-side in order to make the strings completely square (Well… rectangular) around the car. To do this we use the tools in the step below to measure and slide the horizantal bars until the measurements to all our hubs are even (Rear to rear, front to front… as a Miata has a slightly different track width front-to-rear. This is why we mark out bars for setup reference points, but also allow room for adjustment to fine-tune. Sometimes I’ll have the bars setup within 2 minutes… other times i’m bouncing around the car for 15 minutes until it’s “right”. Ideally, we would be measuring off a static point on the chassis, as the hub will move in-and-out with adjustment… but the hub is close enough to get the job done, and much easier to reach.
6) The Wheel Gauge and Machinist Ruler: For this type of alignment, we are using the lip of the wheel for our measurements: With this, we are assuming the wheel is round and true: If you have especially bent up wheels, you may be in trouble for getting accurate measurements, so make sure your wheels aren’t wobbly. All I use for my wheel gauge is a piece of angle iron and a machinist ruler (toe and manual camber) or a cheap digital angle gauge (Camber & calculating Caster).
Steel is nice because the (later step) camber gauge will just stick to the bar, but the Aluminum bar was easier to maneuver and just felt more precise.
A Machinist ruler is nice because it’s small (You aren’t wielding a 12″ ruler to use 2″ of the ruler for measurements within 1/16 of an inch). And they measure to 1/32nd of an inch. I typically target my measurements within 1/16 of an inch, but having a bit more precision is certainly helpful in the process, and if I can get to 1/32nd of my target, I will…. even if the margin of error of my system is probably greater than that.


7) Measuring Camber: Camber is simple, using the same bar I use for setting the box and checking toe, I now place it vertically on the wheel. With the digital angle gauge pressed up against the bar, I get my camber number.
THIS is the angle gauge I have. (Amazon Affiliate Link) There are cheaper options you can try, but I know this one works well for me and I have a hard time trusting items on amazon unless they have several thousand good reviews.
The tough part about the camber gauges is verifying calibration. Call me crazy, but I also like to “verify” my camber gauge measurement once in a while by dropping a plumb string, measuring, and doing the math to verify gauge calibration: I have also found that zeroing the gauge with the longest bubble level I have gets me close enough to get repeatable measurements side to side, and they’ll verify with a plumb-bomb & math verification.

8) Measuring Caster: I avoided measuring caster for a long time, I figured the complication wasn’t worth it… Turns out, it’s pretty simple… basically just turning the wheel and measuring the camber gain from a specific degree angle, no extra tools needed.
9) Doublechecking/Verifying Measurements: The string box around the car is a great way to get a picture of the toe of each wheel, but measuring off them can be finicky. It may get knocked off calibration/etc. I ALWAYS check my measurements with toe plates to verify. Another benefit of pulling out the toe plates: You can get a quick visual estimate if a wheel is toed-in or toed-out by stepping back and seeing how the string relates to the plate on the wheel.


10) Something to write on and with: You’re going to be taking a lot of measurements. Having an easy to read, standard form for them is important as it will help you stay organized and consistent. I created a sheet to fill out when taking measurements that helps me not only keep my measurements, but do my math correctly and check them to be sure they’re accurate.

Feel free to use and share my sheet below, I recommend printing a stack and keeping extras on hand. I go through at least two per job as I like to get a full car baseline before I start messing with anything.
Once you’re doing an alignment, it gets pretty self explanatory. Each wheel has 3 spaces for measurements – Front of Wheel, Center, and Rear. There is a place to write that toe, total toe, and even a spot for Toe-Plate verification. I make sure to date each sheet, and also note what color marks I use on my alignment bolts.

11) Marking and HOLDING your alignment: There’s not much worse than an alignment slipping and losing all your hard work. Maybe you brushed another car, or just hit a curb a little too hard… or perhaps the car just feels weird and you want to verify the alignment. Marking the position of your adjustable components is essential to maintaining an alignment.

There have been multiple times I’ve pulled out the toe plates to discover my numbers WAY off, checked my alignment bolts and yup, one had slipped. With a marked bolt, I knew where to return the bolt to and restore my toe to proper numbers. If resetting the bolts to your marks doesn’t restore toe where it was during your last alignment… You know something may be bent.
Really, alignment bolts can be marked with anything that works. A clean enough car can be marked with a sharpie. Wax crayons are popular. I got a box of assorted color “China Markers” for very cheap, but i’m not in-love with the rather vague marks they leave. As long as it can go on, be legible, and not be accidentally wipe or worn off.. It will work. Multiple colors are a bonus as you can try different settings… but be sure to mark WHICH color is current on your alignment sheet so you aren’t left scratching your head at the track.

Doing a proper alignment doesn’t take thousands of dollars in precision, specialty tools. It just take a few bucks, some patience, and a couple runs to the hardware store.
When I put my rig together I used a bunch of scrap I already had lying around (Wood, Metal, etc) so it only cost me a few dollars… But even if you need to buy everything you still aren’t looking at too high of a bill.
Alignment Parts:
2 pieces of 10′ 1/2″ EMT Conduit – $15
Conduit Hanger bag – $4
8′ of 1″ wide 1/8″ thick aluminum bar – $25
8′ of 1″ aluminum angle iron – $20
Misc Hardware (Rivets, Screws, Bolts, Nuts) – $11
Spring Clamps – $4
Alignment Parts Estimated Total – $110
The standard “Iron Canyon Motorsports” Kit used to sell for $200 but has been out of production for a while. “Smart Strings” kits are nearly $700. So, if you can get your hands on a cheap used kit, that may be nice… But hand bending some bars is quite the simple fabrication project, all to save you hundreds of dollars.
Riser Blocks:
2×10 (or 12). 4@$15 – $60
Peel and Stick tiles $8
Black Plastic Bags $5
Misc Hardware (Screws) $7
Riser Block Estimated Total – $80
Estimated Complete Total: $190
Misc:
If you don’t have them yet, you’ll also need Toe Plates. I have a Longacre set myself, and recommend it. Reviews are mixed for knockoff brands so I’d stick with a brand with a more established brand and reputation. It would suck to save $30 on a set of plates and waste a week fighting bad measurements, or worse: destroy a set of new tires before you realize theyre warped.
For a Miata, a pair of long 17mm wrenches goes a LONG way to easily moving (And tightening the hell out of) your alignment bolts. I find that the Harbor Freight Long Handle wrenches come in handy for multiple jobs.
On the subject of bolts, don’t forget your alignment bolts. I’ve found they were cheapest direct from Mazda Motorsports but can be found at all the major Spec Miata retailers around $100. When I order bolts I also get a few extra washers as they are the cheapest part, and also the first part to wear out.
Hub Stands have been around for a long time in pro racing and are quickly rising in popularity among club racers. Hub stands replace the riser blocks, as they take the job of lifting the car and replacing the wheels. They also give you much more easy access to adjustable surfaces like alignment bolts. While they may be becoming more affordable, they’re still out of my budget. I have also heard some issues with measurements not staying the same once wheels get bolted back on the car. For now, I’ll stick with the less complicated wood riser blocks.
So there you have it: All you need to be able to do your own alignments in your garage and even at the track. If you are starting absolutely from scratch you’re looking in the $250 range for material, which is not insignificant… but already cheaper than basically any performance alignment you’ll be able to get.
Want to keep reading on Racing and Spec Miata? Check out the Ultimate Spec Miata Handbook by clicking the image link below:

Here’s a photo dump with a bunch of different shots in construction/use of my rig. Let me know if you need any more pictures/have any questions!


Note: This post has some Affiliate Links with Amazon – If readers click on them and purchase from Amazon, No Money Motorsports earns a small commission. Help support the blog by using those links for purchases!
I used to do strings. But they take too long to setup, and too hard to work around compared to lasers. I’ve stopped using the string method since trying this:
https://nasaspeed.news/tech/suspension/setting-toe-with-a-laser-level/
I’ve been hearing about that since posting this. Picked up a laser level and plan on giving it a shot myself, I’ll do a followup article based on it.
Nooby question: How do you get the car up on those blocks?
I almost always jack my car up one side at a time via the middle of the pinch weld. I’ll jack one side high as the low jack will go and put it on jack stands, then lift side two into stands. Then I’ll go get my heavy duty jack for the final lift high enough to slide the blocks under the tires. You can also (very carefully) use blocks on a smaller jack to get that extra height